

Download & Install the client
Go to the OpenVPN’s Community Downloads page, and download the version appropriate to your version of Windows.
Once downloaded, install the OpenVPN Client. Confirm any User Account Control prompts you receive.
Double click the OpenVPN installer. You will be presented with the Welcome to OpenVPN Setup Wizard welcome screen.
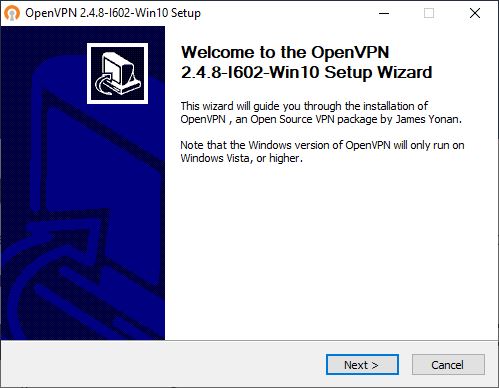
Click Next

Agree to the OpenVPN End User License Agreement
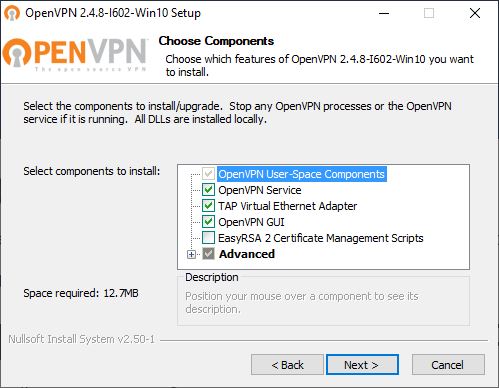
Select the components to install. If you are not sure then install the default selection.
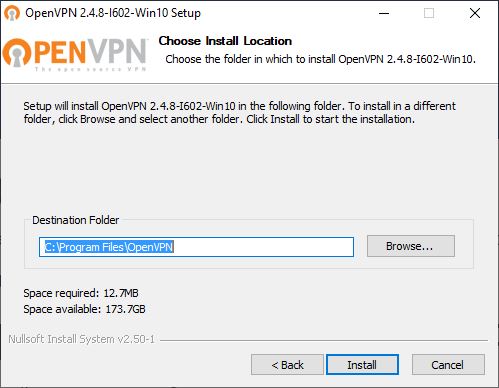
Choose the installation folder. Normally you will leave this as the default C:\Program Files\OpenVPN.
Click Install
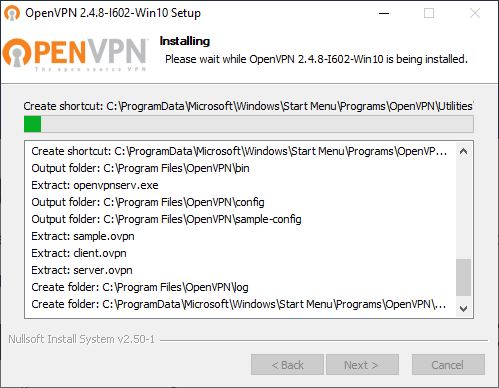
The OpenVPN installer will then present a rapidly scrolling screen of information. Unless there is an issue you can safely ignore this.
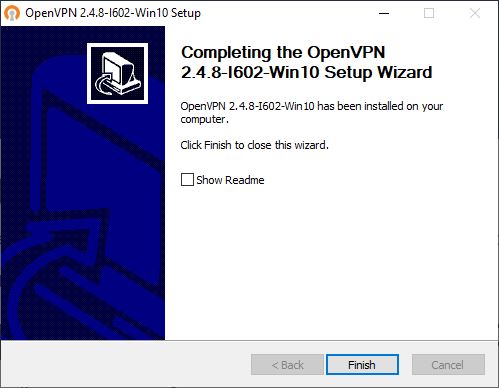
Untick the Show Readme (unless you want to read it), and click Finish.
You OpenVPN Client is now installed.
You will now have the OpenVPN GUI icon on your desktop.
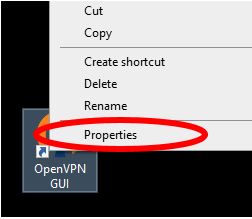
Right click on the icon and select Properties
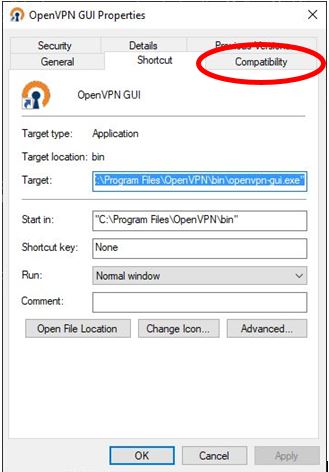
Next select Compatibility

Under Compatibility tick the box Run this program as an administrator.
Click OK.
And we’re done! Your OpenVPN Client has been installed and is ready to be configured.
[…] the client is installed, navigate to c:Program […]
… [Trackback]
[…] There you will find 6237 more Infos: comden.co.za/wp/how-to-install-openvpn/ […]
… [Trackback]
[…] Info to that Topic: comden.co.za/wp/how-to-install-openvpn/ […]
… [Trackback]
[…] Read More on that Topic: comden.co.za/wp/how-to-install-openvpn/ […]
… [Trackback]
[…] Find More Information here on that Topic: comden.co.za/wp/how-to-install-openvpn/ […]
… [Trackback]
[…] Read More Information here to that Topic: comden.co.za/wp/how-to-install-openvpn/ […]
… [Trackback]
[…] Read More Info here on that Topic: comden.co.za/wp/how-to-install-openvpn/ […]
… [Trackback]
[…] Read More Information here on that Topic: comden.co.za/wp/how-to-install-openvpn/ […]
… [Trackback]
[…] Find More here on that Topic: comden.co.za/wp/how-to-install-openvpn/ […]
… [Trackback]
[…] Find More here to that Topic: comden.co.za/wp/how-to-install-openvpn/ […]
… [Trackback]
[…] Read More Information here to that Topic: comden.co.za/wp/how-to-install-openvpn/ […]
… [Trackback]
[…] Find More here to that Topic: comden.co.za/wp/how-to-install-openvpn/ […]
… [Trackback]
[…] Find More on on that Topic: comden.co.za/wp/how-to-install-openvpn/ […]
… [Trackback]
[…] Find More here on that Topic: comden.co.za/wp/how-to-install-openvpn/ […]
… [Trackback]
[…] Read More on to that Topic: comden.co.za/wp/how-to-install-openvpn/ […]
… [Trackback]
[…] Read More on to that Topic: comden.co.za/wp/how-to-install-openvpn/ […]
… [Trackback]
[…] Read More Info here to that Topic: comden.co.za/wp/how-to-install-openvpn/ […]
… [Trackback]
[…] Find More here on that Topic: comden.co.za/wp/how-to-install-openvpn/ […]
… [Trackback]
[…] Find More on on that Topic: comden.co.za/wp/how-to-install-openvpn/ […]
… [Trackback]
[…] Read More on to that Topic: comden.co.za/wp/how-to-install-openvpn/ […]
… [Trackback]
[…] Find More Information here on that Topic: comden.co.za/wp/how-to-install-openvpn/ […]
… [Trackback]
[…] Find More Information here on that Topic: comden.co.za/wp/how-to-install-openvpn/ […]
… [Trackback]
[…] Read More on that Topic: comden.co.za/wp/how-to-install-openvpn/ […]
… [Trackback]
[…] Info on that Topic: comden.co.za/wp/how-to-install-openvpn/ […]
… [Trackback]
[…] Find More on that Topic: comden.co.za/wp/how-to-install-openvpn/ […]
… [Trackback]
[…] Read More Information here on that Topic: comden.co.za/wp/how-to-install-openvpn/ […]
… [Trackback]
[…] Find More to that Topic: comden.co.za/wp/how-to-install-openvpn/ […]
… [Trackback]
[…] Find More on on that Topic: comden.co.za/wp/how-to-install-openvpn/ […]
… [Trackback]
[…] Find More on on that Topic: comden.co.za/wp/how-to-install-openvpn/ […]
… [Trackback]
[…] Read More Info here to that Topic: comden.co.za/wp/how-to-install-openvpn/ […]
… [Trackback]
[…] Read More Info here to that Topic: comden.co.za/wp/how-to-install-openvpn/ […]
… [Trackback]
[…] There you can find 21932 additional Info on that Topic: comden.co.za/wp/how-to-install-openvpn/ […]
… [Trackback]
[…] Find More here on that Topic: comden.co.za/wp/how-to-install-openvpn/ […]
… [Trackback]
[…] Read More on on that Topic: comden.co.za/wp/how-to-install-openvpn/ […]
… [Trackback]
[…] Info to that Topic: comden.co.za/wp/how-to-install-openvpn/ […]
… [Trackback]
[…] Info to that Topic: comden.co.za/wp/how-to-install-openvpn/ […]
… [Trackback]
[…] Read More here on that Topic: comden.co.za/wp/how-to-install-openvpn/ […]
… [Trackback]
[…] Read More Info here on that Topic: comden.co.za/wp/how-to-install-openvpn/ […]
… [Trackback]
[…] Read More here on that Topic: comden.co.za/wp/how-to-install-openvpn/ […]
… [Trackback]
[…] Info on that Topic: comden.co.za/wp/how-to-install-openvpn/ […]
… [Trackback]
[…] Find More on that Topic: comden.co.za/wp/how-to-install-openvpn/ […]
… [Trackback]
[…] Find More Info here on that Topic: comden.co.za/wp/how-to-install-openvpn/ […]
… [Trackback]
[…] There you can find 51259 more Info on that Topic: comden.co.za/wp/how-to-install-openvpn/ […]
… [Trackback]
[…] Info to that Topic: comden.co.za/wp/how-to-install-openvpn/ […]
… [Trackback]
[…] Info on that Topic: comden.co.za/wp/how-to-install-openvpn/ […]
… [Trackback]
[…] Find More to that Topic: comden.co.za/wp/how-to-install-openvpn/ […]
… [Trackback]
[…] Read More Info here on that Topic: comden.co.za/wp/how-to-install-openvpn/ […]
… [Trackback]
[…] Read More to that Topic: comden.co.za/wp/how-to-install-openvpn/ […]
help to write essay
How To: Install OpenVPN – Computer Den Support Services
viagra
How To: Install OpenVPN – Computer Den Support Services
cialis online
How To: Install OpenVPN – Computer Den Support Services
cialis цена
How To: Install OpenVPN – Computer Den Support Services
drug categories viagra cialis
How To: Install OpenVPN – Computer Den Support Services
generic cialis dapoxetine
How To: Install OpenVPN – Computer Den Support Services
viagra canada
How To: Install OpenVPN – Computer Den Support Services
generic cialis (tadalafil) 20mg
How To: Install OpenVPN – Computer Den Support Services
what is the maximum daily dose of cialis
How To: Install OpenVPN – Computer Den Support Services
buy cialis online generic
American health
buy cialis online europe
American health
cialis for sale nz
How To: Install OpenVPN – Computer Den Support Services
online indian pharmacy
How To: Install OpenVPN – Computer Den Support Services
when to take cialis best time to take
How To: Install OpenVPN – Computer Den Support Services
iron dragon cialis
How To: Install OpenVPN – Computer Den Support Services
good online mexican pharmacy
How To: Install OpenVPN – Computer Den Support Services
cialis doctor online
How To: Install OpenVPN – Computer Den Support Services
cvs pharmacy rx hours
How To: Install OpenVPN – Computer Den Support Services
generic cialis (tadalafil) 20mg 30
How To: Install OpenVPN – Computer Den Support Services
토토사이트 이용 안내
최근 다양한 연령층에서 스포츠에 대한 관심이 많아지면서부터 스포츠토토를 찾는 사람들이 많아지고 있습니다. 배트맨토토를 제외한 토토사이트는 모두 사설업체가 운영하는 곳이며 이러한 이유로 사고에 대한 위험도 감수하면서 게임을 즐겨야 합니다. 요즘들어 청소년들도 이러한 스포츠토토를 이용하는 경우가 많은데 청소년은 절대 이용하실 수 없습니다. 토토사이트를 이용하시기 전에는 회원가입 후 공지사항을 꼭 필독하신 후에 이용하시는 것을 권해드립니다. 모든 사이트의 룰과 규정이 다르기 때문입니다. 예로 어떤 곳은 승/무/패 + 언더/오버 베팅이 가능한 곳도 있지만 어떤 곳은 금지되는 곳도 있듯이 여러 규정 사항을 확인하시거나 승인전화가 왔을 때 상담원을 통하여 궁금점을 물어보신 후 이용하시는 것이 좋습니다 메이저사이트
.
online pharmacy college
How To: Install OpenVPN – Computer Den Support Services
viagra near me
How To: Install OpenVPN – Computer Den Support Services
reddit best online pharmacy
How To: Install OpenVPN – Computer Den Support Services
unc student store pharmacy
How To: Install OpenVPN – Computer Den Support Services
generic viagra name
How To: Install OpenVPN – Computer Den Support Services
https://regcialist.com
How To: Install OpenVPN – Computer Den Support Services
blood pressure medication norvasc
How To: Install OpenVPN – Computer Den Support Services
does atorvastatin cause constipation
How To: Install OpenVPN – Computer Den Support Services
prilosec coupon
How To: Install OpenVPN – Computer Den Support Services
zoloft davis pdf
How To: Install OpenVPN – Computer Den Support Services
getting high on lyrica
How To: Install OpenVPN – Computer Den Support Services
escitalopram and vision
How To: Install OpenVPN – Computer Den Support Services
pravastatin vs atorvastatin
How To: Install OpenVPN – Computer Den Support Services
1
How To: Install OpenVPN – Computer Den Support Services
does cymbalta help with anxiety
How To: Install OpenVPN – Computer Den Support Services
ivermectin shampoo
How To: Install OpenVPN – Computer Den Support Services
how long is viagra good for
How To: Install OpenVPN – Computer Den Support Services
maximum cialis dosage
How To: Install OpenVPN – Computer Den Support Services
cialis from india online pharmacy
How To: Install OpenVPN – Computer Den Support Services
generic viagra in usa
How To: Install OpenVPN – Computer Den Support Services
generic viagra without prescription
How To: Install OpenVPN – Computer Den Support Services